
The family got together yesterday to celebrate my grandmother's 89th birthday. My sweet aunt hosted us for a delicious Italian Sunday dinner--stuffed shells were the star, but soon after the pasta was demolished we tore into this cake.
This is another from-a-box cake, doctored for perfection. Everyone loved it, though I must say it was VERY sweet and there are some things I would do differently for future tries.
First, the recipe is from the What Can I Bring? Cookbook by Anne Byrn, the Cake Mix Doctor herself. I guess this was the right book for me, since I'm a box cake mix fan. I recently borrowed this book from the library
I won't reprint the recipe verbatim here. You can find the cookbook at your local library--or online here--to see for yourself. It's very easy to make, but I do have a few notes:
- First, this mustn't be removed from the fridge or frosted until the very last minute. You can see from the photo above that the milk syrup was oozing out of the bottom and pooling at the base of the plate. It got much worse and dribbled onto the counter, the tablecloth, my aunt's blouse... ugh! Of course we made short work of it with a couple of spoons, but still. Messy, messy, messy. That said, it would be even easier made in a regular 13x9-inch pan to contain any leche-leakage.
- I modified the soaking syrup a tad by reducing the amount of heavy cream from 1 cup to 1/2 cup because I was convinced that this cake couldn't possibly soak up all that milk. It did, but it was fine without the extra half cup of cream. In the future I might try using light coconut milk to replace the cream and some of the sweetened condensed milk. I think it would add a nice additional dimension to the cake, and since we found it all rather on the sweet side, reducing the sweetened condensed milk would be a good thing.
- I forgot the vanilla extract. It wasn't missed at all.
- I baked the cake in a 7-inch deep springform pan. All the batter fit in the same pan, which was great. It took a good hour in the oven, though, to cook through.
- The sliced strawberries were a fantastic accompaniment. They cut through some of the sweetness of the cake nicely.
- I frosted the cake with non-dairy whipped topping, since I had to travel an hour with this whole shabang and assemble at my aunt's house. Much easier than dealing with whipping cream at someone else's house.
Come to think of it, the milk probably was leaking out because we'd traveled an hour with the thing! I wonder if it would be better to freeze it before transporting?
At any rate, it was a success. G'ma enjoyed her cake, and so did the rest of the family. I'd call it a success.
Monday, June 1, 2009
Tres Leches Cake with Strawberries


Thursday, May 28, 2009
Rhubarb-Topped Spice Cake
Have I ever mentioned that I'm a cake mix fan? There are very few cakes that I make that don't start with a box mix. Sad, isn't it?
It's not that I don't know how, or can't do it. I do, and I can. I just find the process... tedious. I suppose I'm rather Sandra Lee-ish in this way. I just have little desire to make a cake from scratch when there's a perfectly good box mix to whip it up in a jiffy with very little measuring to do.
And there you have it. My dirty little secret.
I do, however, quite like 'doctoring' the cake mixes for something out-of-the-ordinary. I don't usually follow instructions for doctoring, however--I generally just go my own way and let the cake fall where it may, so to speak.
This time, I had a big load of rhubarb a-ready to go, and thought that it would be nice with spice cake. I was going for an upside-down cake effect, but it didn't turn out that way. Even so, it was moist and delicious without having to bother with frosting (another tedious project). Best of all--Mr.W gobbled it up.
Rhubarb-Topped Spice Cake
Butter a 9x13-inch pan or whatever pan you fancy. I used a 9-inch round springform pan, which was a mistake. The topping leaked through--so if you use a springform, be sure to wrap the exterior in foil to keep your oven bottom from looking like mine (that is, covered with burned blobs).
While preheating your oven to 350*F (or 325*F if using a dark or nonstick pan), throw a stick of butter (I used salted) in your pan right in the oven to melt. No sense in dirtying another dish, right? When it's melted, sprinkle in 3/4 cup (packed) brown sugar. Stir until the sugar is almost melted. Top with 3 cups of chopped fresh rhubarb, followed by your spice cake batter (made according to package directions).
Bake in the center of your oven until a cake tester comes out clean when inserted at the center. The timing depends on the shape of your pan. Check the directions on your cake mix box for more guidance.
Remove from oven and cool for 5 minutes before removing from pan. Cool completely before serving, or serve warm with a scoop of vanilla ice cream.
Thursday, July 24, 2008
A Birthday Cake
Tuesday was Mr.W's birthday. He's finally 35!
We had a little party which I'll call a reverse surprise party--invited guests didn't realize it was to celebrate his birthday. We wanted to avoid the pressure of gifts, so we didn't mention it. We just wanted to enjoy the day with friends.
And being true to himself, a store-bought cake wouldn't do. Mr.W generally does not like cake, but indulges once a year in his favorite--German Chocolate Cake. And it's impossible to order such a cake at our local grocery bakeries sans pecans (because he hates nuts in his food, but likes to eat nuts all by themselves--go figure), so I'm obliged to make a custom version at home.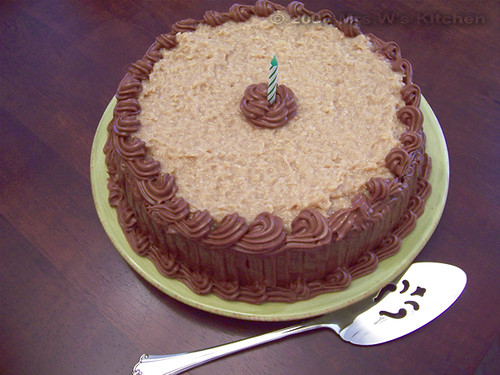
It turned out pretty well.
I used a box mix and canned chocolate frosting, but made the coconut frosting myself. Here are the full details:
- I used a German Chocolate Cake mix, but used melted butter instead of oil and used milk instead of water. It was baked in an 8-inch springform pan.
- After cooling overnight in the pan, it was transferred to a serving platter.
- The canned milk chocolate frosting was whipped in my kitchenaid to add a bit more air into the frosting for a lighter consistency. Half was put into a zipper bag fitted with a flat piping tip for frosting the cake sides. The remaining frosting was put into another zipper bag fitted with a star tip for the edge detail.
- I started by piping flat lines around the edge from bottom to top to cover the sides of the cake. I did this because I'm terrible at spreading frosting with a knife or spatula, and it seemed that this would be the best way to get a clean look without a big mess on the serving plate.
- Then I spread the coconut frosting on the top of the cake. It was made the day before thusly:
Coconut Frosting
1 can of sweetened condensed milk
1 stick salted butter
2 egg yolks, beaten
1-1/3 cups unsweetened flaked coconut
1 tablespoon vanilla extract
2 teaspoons cocoa powder
extra milk as needed
In a heavy-bottomed saucepan set over medium-low heat, combine sweetened condensed milk and butter; stir often as butter melts. When melted and combined, pour a thin stream of milk-butter mixture into egg yolks while whisking vigorously to temper. You only need to pour in maybe 1/4 cup or so--just enough to warm those yolks without making scrambled eggs. Now pour the yolk mixture into the saucepan with the rest of the milk-butter mixture and stir; cook for about 10 minutes. Remove from heat and stir in coconut, vanilla extract and cocoa powder. Cool and refrigerate overnight. When ready to frost cake, I had to thin the frosting with milk to make it spreadable.
- Then I used the frosting with the star-tip to decorate the bottom and top edges of the cake, along with a rosette in the center for the candle.
Pretty good for a novice cake decorator, I'd say. The cake was very light and the modifications resulted in a flavor that hid the fact that it was from a mix. The coconut frosting was amazing. I had a literal sugar high that day--I just could not resist it.
The cake was served as part of a several available munchies at his party, which included a jam tart (I'll do a separate post on that), turkey and roast beef sandwich slices (just store-made submarine sandwiches cut into slices and held together with toothpicks, dishes of mayo and mustard available on the side), potato chips and onion dip, and corn chips with salsa. This was a quick-and-easy get together made largely of store-bought, home-embellished food.
Hey, sometimes you just have to take the help where you can get it.
Sunday, December 9, 2007
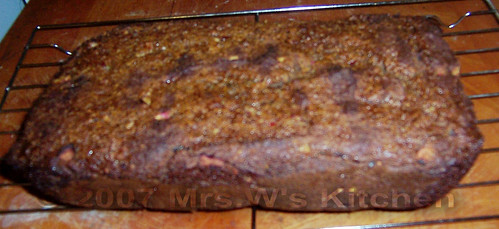
Cranberry-Pumpkin-Flaxmeal Tea Bread
 Due to my dietary restrictions, when I'm invited to someone's home for a meal or an event where there will be snacks served, I often prepare myself so that I'll be a welcome guest. After all, no one wants a guest who makes them feel bad about not thinking about or knowing your food issues, and refusing too many items or not eating at all is a sure way to do just that.
So how do you become a welcome guest without offending your hosts?
Here's what I do:
- If they inquire about dietary restrictions, I tell them. But I don't make it so difficult that they wish they'd never asked. For example, recently I was invited for a casual pizza night, and they planned to order pizza, wings and antipasto. I told them it would be fine--I ate salad and wings, and avoided the pizza. Simple.
But if they don't ask, then...
- I make sure I'm not really hungry when I go to their home. No, I don't eat a full meal beforehand, but I might have a later lunch, or eat a safe food before I leave home, like a salad or a cup of soup. That way, I can eat what I can at their home without going hungry.
- I offer to bring/just bring something to contribute that is a safe food for me. (This works best in casual situations with your more intimate friends.) Especially in buffet-style service, no one will actually notice that you're mostly just eating what you brought!
However sometimes you just can't prepare. I was once at an office retreat and they provided lunch each day. Sandwiches, pizza, chinese food--all of which have bread and/or sugar in most cases. I always came prepared with some quick go-to food in my purse: fruit, string cheese, a salad. You can always take the meat off a sandwich if it has not been already dressed with some sweetened dressing or spread. I've also scraped the cheese and toppings from a pizza. At an office function I think that's okay, but I wouldn't do that in front of a host in their home.
Friday was another movie night with our friends, and I really wanted to bring something different. Full of good-for-me foods and no wheat or sugar (though you could make it with sugar), this Cranberry-Pumpkin-Flaxmeal Tea Bread has a wonderful crumb and texture and a light sweetness. No need to feel guilty about having another slice, either--it's chock full of healthy ingredients! My sugar-eating friends didn't even know this was sugar-free. This batter would be great made into pancakes or muffins, too.
Cranberry-Pumpkin-Flaxmeal Tea Bread
(Wheat-Free, Sugar Free) adapted from Cranberry Pumpkin Muffins published in Eating Stella Style by George Stella
1/2 cup soy flour
1 cup flax meal
1 teaspoon baking powder
1 teaspoon baking soda
The equivalent of 3/4 cup brown sugar (I used 3/4 teaspoon stevia powder)
1/2 teaspoon ground cinnamon
1/2 teaspoon ground nutmeg
1/4 teaspoon ground cloves
1/2 teaspoon salt
1 cup pumpkin puree or other winter squash puree (I used hubbard squash puree)
3 eggs
2 teaspoons vanilla extract
1 cup chopped fresh or frozen cranberries (edited note: you can double the cranberries for extra zing--delicious)
1/4 cup chopped nuts (I used hazelnuts, but pepitas or sunflower seeds would be equally delicious; optional)
Honey or agave nectar
Preheat oven to 350*F. Grease a loaf pan.
Combine first nine ingredients in a medium bowl. Add pumpkin, eggs and vanilla and gently mix with a wooden spoon until just combined. Fold in cranberries and nuts.
Spread into prepared loaf pan. Drizzle top with honey and bake until a cake tester inserted in the center comes out clean, about 30 minutes.
Cool in pan 5 minutes before removing cake from pan to wire rack. Cool, slice and serve.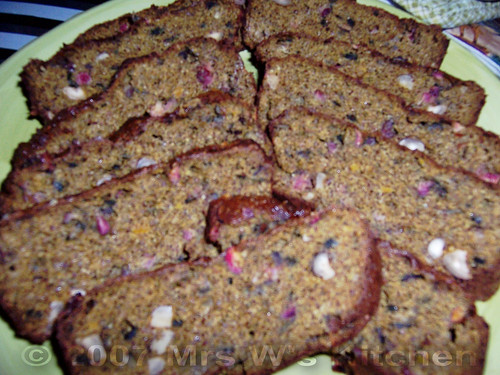
I also find that if I make sure to invite my friends to my house, I serve foods that I would and can eat--always to rave reviews. They learn about what I can eat that way.
If you have the right attitude about your dietary restrictions, you need not be one of "those" guests that make it impossible your host. Be gracious, be casual about it all, and when all else fails, pick around what is served and make it look like you ate most of it, and eat when you get home.
Thursday, October 25, 2007
Ugliest Gourmet?
I've made all sorts of ugly food: stews, soups, cakes, goulash and pasta dishes. We all know that delicious doesn't always mean pretty. At least not in my kitchen.
When I read about the Ugliest Gourmet contest (see the roundup and voting here) hosted by Not Eating Out in NY, so many dishes ran through my mind: hamburger stroganoff (you know the stuff--hamburger, cream of mushroom soup, a can of sliced shrooms and boiled egg noodles), split pea soup, and my beloved doro wat among them. But as I pondered these things, the one that took the cake (har) was this. Now I realize that the idea behind this foodblogging event is to present delicious foods that just come out, well, regular-looking. The way food looked when mom slapped it on a plate for you when you were a kid. After all, most of us aren't restaurant chefs with varied garnishing accoutrements around, are we?
So yes, I am blurring the lines a bit by submitting this cake, but in support of my decision I DID have people gagging just looking at it. Seriously. One woman wouldn't even try it because it looked so... authentic. But it was delicious. Really!
Unappetizing at it's finest, it brought tremendous laughs and more than a few disgusted gags when we all dug in. Here's the recipe and procedure.
Kitty Box Cake
You can make any cake you like for this presentation, because you'll cut it up and cover it completely (more like a trifle, really). This is the cake recipe I love, specifically for it's flavor; the below recipe is pretty much identical to this original recipe except for my choice of liquid.
Cake ingredients:
2 cups flour
3/4 cup cocoa
1 1/4 teaspoons baking soda
1/2 teaspoon salt
3/4 cup butter
1 3/4 cup sugar
2 eggs
1 teaspoon vanilla extract
1 1/4 cup desired liquid (I puree thawed frozen unsweetened strawberries until I have the correct amount of liquid)
Topping ingredients:
sliced strawberries (optional)
3 or more boxes instant vanilla pudding, prepared according to package directions for pudding
1 box instant pistachio pudding NOT prepared
crushed vanilla wafer cookies
1 box Chocolate-Covered Mini Tootsie Rolls
1. Heat the oven to 350*F. Butter and flour a 9"x13" pan or whatever kind of cake pan you wish. Sift flour with the cocoa, baking soda, and salt into a bowl.
2. Cream the butter in an electric mixer, beat in the sugar, and continue beating until the mixture is light and fluffy, 3 to 5 minutes. Add the eggs, one by one, and then the vanilla, and continue beating 1 to 2 minutes. Sift a third of the flour over the butter mixture and fold them together, using a spoon. Fold in a third of the juice. Add the remaining flour and juice alternately in two batches.
3. Spread batter in the prepared pans and bake in the oven until the cakes start to shrink from the sides of the pan, 30 to 35 minutes; a metal skewer inserted in the center should come out clean. Let the cakes cool 10 minutes in the pans, then turn them out on a rack to cool completely.
4. Completely line a new kitty pan or dishpan with a turkey-sized oven roasting bag. Tape to exterior, if needed to secure.
5. Prepare 3 or more boxes (you'll have to do this part by eye) of instant vanilla pudding with milk for pudding directions according to box. Put in refrigerator to set up. Cut cooled cake into chunks to transfer to prepared kitty pan. I like 2" chunks, but you could do this any way you like, as long as it ends up being easy to serve with a scoop or spoon.
6. Top cake with a layer of sliced strawberries (optional). Then spread with pudding. Sprinkle with crushed/crumbly vanilla wafer cookies to resemble kitty litter. I used coarse and fine crumbs for texture. Dust with a scant amount of dry pistachio pudding mix for slight greenish color.
7. Pour Chocolate-Covered Mini Tootsie Rolls onto a microwave-safe plate and microwave on high in 20-second increments until soft but not completely melted. With gloved hands, shape into desired shapes and decorate the top of your cake, draping one or two over sides of pan, just like a naughty kitty.
8. Chill until ready to serve with a new, unused kitty scooper.
Note: Not for the faint of heart! Oh... and you may want to keep pets away from this dessert.
Edited post-script: I got the idea for the design of this cake from a poster on the Martha Stewart Food Boards.
See the round-up and voting here, and the winner here. I tied for 2nd place--not too shabby! Er... maybe I shouldn't be bragging about that...


