
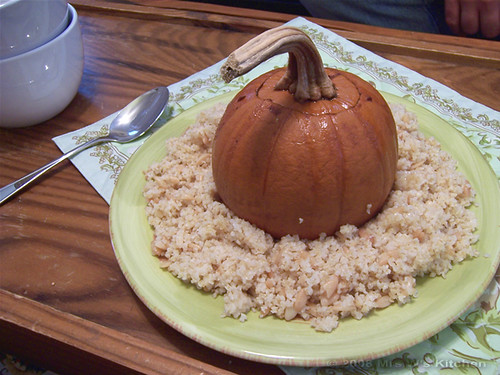
Lacking the traditional cooking vessel (called a tagine), I've always used either a slow cooker or a casserole dish to make Moroccan tagines (stews that are cooked in the vessel by the same name)--but in a stroke of brilliance it occurred to me to cook it inside a pumpkin.
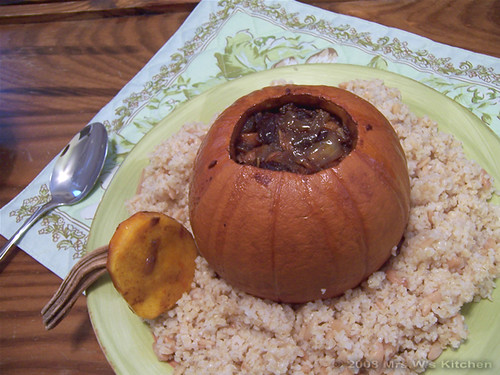
It was fantastic, and the presentation was everything that is autumn.
I served the dish with a bulgur wheat-orzo pilaf (seasoned only with a bit of lemon juice), and only that because couscous at my local market was just too darned expensive by comparison, and I justified the substitution with an argument for whole grains. I felt that the accompaniment was good, though I wish I had thought to stir in some chick peas for added texture.
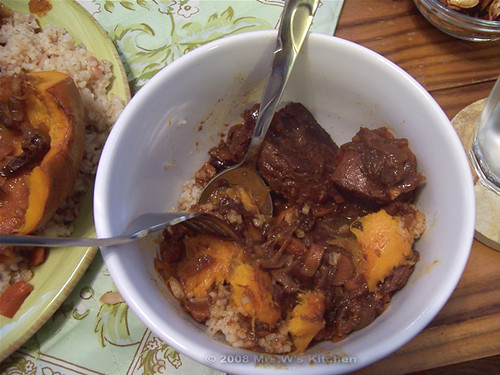
The soft pumpkin flesh offered a lovely counterpoint to the tagine, which was lightly spicy with a delightfully complex blend of spices. The cinnamon was certainly in the forefront here, and clung beautifully to the meat that melted in your mouth.
Lamb and Prune Tagine in a Pumpkin
serves 2 generously
1 small pie pumpkin, rinsed, dried, top removed (reserved) and seeds and strings removed (wash and roast those seeds for a healthy snack!)
olive oil
1 pound lamb (I used 3 small lamb shoulder chops and 2 chuck eye steaks because that's what I had on hand)
1 large onion, chopped
3 carrots, chopped
5 ounces dried plums (prunes), chopped
3 cloves garlic, minced
1-1/2 tablespoons freshly grated ginger
2 teaspoons sweet paprika
1 teaspoon ground cinnamon
1 teaspoon salt
3/4 teaspoon ground coriander
1/2 teaspoon ground cumin
1/2 teaspoon chopped dried orange zest (optional)
1/4 teaspoon ground tumeric
1/4 teaspoon cayenne
1/4 teaspoon ground cloves
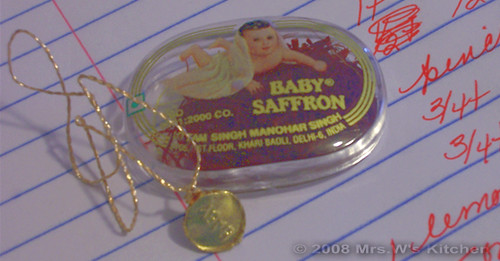
pinch saffron
1 teaspoon lemon juice
2 cups chicken broth
When you wash the pumpkin be certain it doesn't have any cuts that would cause your stew to leak out. You can wrap the exterior with aluminum foil if you wish.
Place empty pumpkin and lid on a greased or nonstick sheet pan. Make sure it's stable and doesn't roll around (might need to use a springform pan ring or foil snake here for stabilization).
In a large saucepan, brown meat well in olive oil on all sides. Remove meat and place in pumpkin. In remaining oil, saute onion and carrots until onions are transparent. Add dried plums, garlic and ginger and cook until garlic is fragrant. Immediately stir in paprika, cinnamon, salt, coriander, cumin, orange zest, tumeric, cayenne, cloves and saffron. Squeeze lemon juice over, then pour in chicken broth. Stir, scraping the bottom to release any browned bits.
Transfer entire mixture to pumpkin. Replace the pumpkin's lid and bake in a preheated 250*F for 2-3 hours, or until the pumpkin flesh is soft.
NOTE: I had more filling than would fit into my pumpkin, so I used a 2nd casserole dish with a lid for the rest.
Serve hot with couscous or bulgur wheat, scooping out cooked pumpkin flesh with your tagine.
We didn't bother with dessert after this one--we were stuffed! If I had served this for supper, I would have finished with some simple dates stuffed with almonds, drizzled with honey and lightly dusted with cardamom.
This is my entry for Waiter, There's Something in my... Gourd! event hosted by Cooksister! See all of the fantastic creations at the roundup--here are lots of holiday ideas for your table!
Wednesday, October 22, 2008
Lamb and Prune Tagine in a Pumpkin


Monday, March 24, 2008
Waiter, there's something in my... Garlicky White Beans
Pulses (beans and legumes) are the required ingredient for this month's installation of the ever-popular "Waiter, there's something in my..." foodblogging event. This month, the host is the talented and ever-so-clever Jeanne of Cook Sister!.
Visit the roundup to see a fantastic array of beany-goodness. There are several awesome recipes that I plan to try!
So without further ado, here is my entry.
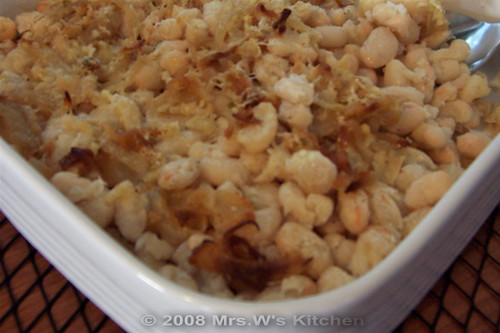
Bursting with garlickyness (is that a word?) and balanced with salty romano cheese and sweet onion, this white bean dish could be served as a vegetarian main course or as a simple, yet flavorful, side dish to accompany meat or poultry.
Garlicky White Beans
serves 2 as a main course or 4 as a side dish
4 cups cooked beans, drained (I used great northern beans; you can use cannelini, or any bean you wish)
1 teaspoon salt
1/4 cup olive oil
1 medium onion, sliced vertically
3 to 5 cloves garlic, minced
freshly shaved romano (or your favorite) cheese
Place beans in a greased casserole dish; sprinkle with salt. Set aside.
In a skillet over a medium flame, saute onions in heated olive oil until transparent; add garlic and saute until fragrant (about 1 minute). Remove from heat and pour over beans.
Shave romano cheese over beans to cover generously, or as desired. Bake in a 325*F oven until top is golden and beans are hot.
Beans may be served hot or at room temperature.
This bean dish was served at my Easter table and was a delicious accompaniment to my leg of lamb.
Monday, February 18, 2008
Mid-Winter Salad
I made a delicious salad last week for our Valentine's Day Dinner that was chock full of goodies. Here in Central New York, there are few local/seasonal ingredients available at this time of year, so I generally rely on imported and canned products until spring rolls around. Even so, one can be creative, right?
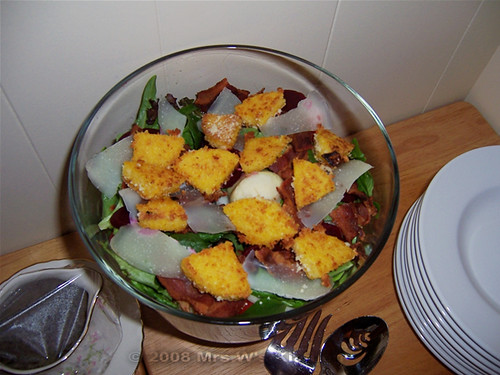
My salad included mixed baby greens, grape tomatoes, sliced cucumber, artichoke hearts, beet slices (cut into heart shapes, of course), black olives, crisp-fried bacon, shaved romano cheese and toasted polenta triangles. Served with the option of a lemon vinaigrette or red wine vinaigrette, it was a tasty addition to our meal.
Mid-Winter Salad
serves 6
5 ounces salad greens of choice, washed and dried
two good handfuls grape or cherry tomatoes, or 2 large tomatoes, cut into wedges
1 large cucumber, peeled and cut into thick slices, each slice cut into 4 wedges
1 15-ounce can artichoke hearts, drained
1 15-ounce can black olives, drained
1 8-ounce can beet slices
about 6 slices bacon, fried crisp and drained on paper towels
several shavings romano (or parmesan) cheese - I used a vegetable peeler for a good dozen wide slices
toasted polenta trianges (recipe follows)
Combine salad greens, tomatoes, cucumber, artichoke hearts and olives in a large bowl. Toss with hands to combine and transfer to a serving dish or platter. Top decoratively with beet slices, bacon, cheese shavings and toasted polenta. Serve with salad dressings of choice.
Mr.W and I find ourselves craving all things citrus at this time of year, so we like a lemon vinaigrette--see my recipe here.
Toasted Polenta Triangles
2-1/2 cups low-salt chicken broth
1 cup polenta (I used Goya brand coarse yellow corn meal)
canola spray
olive oil
grated parmesan cheese
Spray a square or loaf-shaped pan with canola spray and set aside.
Heat chicken broth over medium-high heat in a heavy-bottomed saucepan. Whisking constantly, add cornmeal in a slow stream until fully incorporated. Reduce heat to medium and stir constantly with a wooden spoon as the mixture cooks.
The polenta is done when it comes easily away from the sides of the pot. I found this took about 10 minutes.
Pour hot polenta into prepared pan; press wax paper or plastic wrap onto the surface and set aside to cool. I used an 8-inch glass square pan; I let it sit until it was room temperature, then transferred to the refrigerator for a few hours.
When completely cooled, turn polenta out onto a cutting board. Cut into desired shapes. I used a round cookie-cutter and then cut each circle into four wedges.
Heat a saucepan with about 3 tablespoons olive oil over medium heat; when oil shimmers, carefully add polenta to the pan. You may wish to have a lid handy to help shield yourself from oil splatters. Although a bit dangerous, this step will ensure a nice, crispy crust on those polenta cakes.
Turn your cakes when they have nice golden color on the first side. Immediately sprinkle generously with parmesan cheese for extra flavor. It won't take long for the second side to crisp up. Transfer to a paper towel-lined plate to drain.
Use immediately.
This is my entry for this month's "Watier, There's Something in My... Salad" event hosted by Spittoon Extra!
Sadly, Andrew forgot me in his roundup... but lots of other great salads there.

Friday, November 9, 2007
Pear-Cranberry Galette with Blue Cheese, Hazelnuts and Agave Nectar
Today I made a most delicious galette--which is really just a fancy name for a very rustic tart. Really just a glorified pie--sans top crust, of course--this is the perfect balance of sweet and salty, ideal for the individual who likes a dessert not too sweet. A small slice is just right with a glass of wine.
Make this for a holiday party this year--you won't regret it!
Pear-Cranberry Galette with Blue Cheese, Hazelnuts and Agave Nectar
12 slices
pie crust for a single-crust pie (I made mine very quickly and by eye--shortening, all-purpose flour and cold water--so you'll have to use your own short pastry crust recipe)
1/4 cup salted butter
1/4 cup fresh cranberries
2 large bosc pears, cored and chopped (I left the skin on)
1 tablespoon agave nectar
1/4 pound blue cheese, crumbled
3 tablespoons chopped hazelnuts
additional agave nectar for drizzling
Melt butter in a medium saucepan over medium heat. Turn heat to low and let butter brown--watch this carefully so it does not burn. When the melted butter has become brown in color, add fresh cranberries. Saute until they pop--then mash lightly with a potato masher so they're broken up.
Add chopped pears and 1T agave nectar and saute lightly. Remove from heat and set aside to cool.
Roll out pie crust in an oval--this need not be perfect. Transfer to a greased foil- or parchment-lined cookie sheet. A galette is a rustic presentation. Pour pear-cranberry mixture onto the center of the dough. Spread, leaving about a 2-inch border all around. Top with crumbled blue cheese and chopped hazlenuts.
Fold the crust border up and over the perimeter of the filling. You should not cover it completely--just enough to hold the filling in place. Fold crust decoratively, as desired. Brush exposed crust with an egg wash or milk, if you want a nice sheen on your crust. I actually just spray it with Pam spray and it works for me--and a real shortcut.
Bake in the center of a preheated 350*F oven for about 30 minutes, or until crust is golden brown and filling in bubbly.
Remove from oven and gently slide galette to a rack to cool thoroughly.
Serve wedges with an extra drizzle of agave nectar.
I served this at room temperature with extra agave nectar drizzled decoratively over the slice.
This is my entry for "Waiter, there's something in my... topless tart!" hosted by Jeanne of CookSister. What a fun event this month! See all the clever topless tarts submitted for this event--visit the roundup here.
And again, please do accept my apologies for less-than-ideal photos... with Mr.W galavanting all over God's Green Earth with our digital camera, I am limited to my wee cell-phone camera.
Wednesday, September 12, 2007
Waiter! There's something in my...

Believe it or not, after a horrid, rainy, drizzly, disgusting morning, the sun decided to shine and warm up my little patch of earth this afternoon.
Even so, I realized that I had some tomatoes that were about to go beyond their shelf life. As I began to grate them to make a homemade ketchup, I remembered this month's "Waiter! There's something in my... savory preserves!" event hosted by Johanna of The Passionate Cook.
Yay! I've been wanting to enter a WTSIM event for a while now! Click here to view the roundup for this event.
So here it is... my savory preserve. Spicy Italian Ketchup.
Making ketchup is basically just reducing a sauce to an almost paste-like consistency. With some tomatoes on the windowsill bursting at the peak of freshness, today was the perfect day to make just that.
As a diabetic, it's hard to find tasty condiments that are not loaded with added sugar or... *gasp* the dreaded high fructose corn syrup. So I find it's easier to just make my own--then I can make it taste any way I like.
I was raised in a small Italian-American town, so it's understandable that my tastebuds tend toward italian flavors--basil, oregano, olive oil, tomatoes, garlic and onion. The flavors all blend together to bring me back home, no matter where I've lived or traveled in the world. And, well, spicy is a must in my house.
So my ketchup is just that--spicy and full of italian flavor. It's great on anything, from eggs to french fries (though I don't indulge in those too often these days), and unlike store-bought ketchup, this can be used almost like a sofrito, to season other dishes with a burst of tomatoey italian flavor.
Here's the recipe:
Spicy Italian Ketchup
Ingredients
olive oil
2 cloves garlic, peeled and chopped
1 teaspoon chopped yellow onion (I used one small boiler onion)
4 ripe tomatoes, grated over large holes of box grater, skins discarded
1 tablespoon chopped fresh basil (I used a basil ice cube)
1/4 teaspoon kosher salt
1/4 teaspoon freshly ground black pepper
pinch dried oregano
1/2 cup red wine
2 teaspoons crushed red cherry peppers (these were home-grown red cherry peppers that I chopped and stored in white distilled vinegar in the fridge)
Directions
1. Heat a drizzle of olive oil in a medium saucepan; saute onion until translucent. Add garlic and saute 1 minute--be careful not to burn the garlic.
2. Add grated tomatoes with their seeds & juice (okay, if you want to take the time to strain out the seeds you may. I'm just too lazy for that) with remaining ingredients. Bring to a simmer over medium heat, and continue to simmer, stirring frequently, until liquid is reduced to 1/3 the original amount.
3. Remove sauce from heat and empty into a tall container. Puree using an immersion blender until fairly smooth. This only takes a few seconds. Return sauce to saucepan and return to a simmer over medium heat and continue to reduce until almost all liquid is gone and you have a ketchup-like consistency. Remove from heat and cool 5 minutes.
4. Pour sauce into a clean glass jar (with a metal spoon to keep glass from cracking). Float a little olive oil over the top and seal the lid. When fully cooled, store in the refrigerator.
I keep this in the refrigerator for about 3 weeks. Note that I do not process the jar--hence the time limit to use this stuff up. If you want to make a larger batch and process, go for it. Or it could be frozen in a plastic freezer-safe container.
Whoo-hoo that IS spicy... and my tongue is tingling! You have to try this if you love a spicy tomato condiment!
Bye for now,
Mrs.W


